|
User Guide for using Auto-Login with
Active Directory and LDAP Configurator (Release V7 - March 1, 2011)
Introduction
Many Web+Center installations have a desire to integrate their use of Web+Center with an existing "Active Directory" (or other LDAP-compliant directory) that already contains the relevant information (Usernames, mail addresses, phone numbers etc.) of their user-community. The desire is not only to avoid creating and maintaining two redundant repositories of similar information, but also to enable automatic login to Web+Center of users who have already done a "system level" login and are already authenticated by the system using its own Active Directory. To accomplish this, Web+Center must first be apprised of a certain amount of configuration detail about the Active Directory. This is so that it can know how to access the directory and which data fields are to be mapped into equivalent fields within the Web+Center environment. These configuration settings, are initially established and tested by means of a web-enabled program which is used by a systems administrator who has knowledge of the directory structure and its access parameters. This program allows the system administrator to enter settings in a form and then click on a "Test" button to see if the correct data is returned. When the settings have been established and demonstrated satisfactorily with the "Test" button, the administrator then clicks on a "Save" button to store these settings (subsequently referred to as LDAP settings) for subsequent use by Web+Center's auto-login feature. The Customer+Center application will subsequently make use of these settings whenever a customer attempts to accesses the main entry page of the Customer Center application. This it does in the following manner: It first examines the HTTP header of the user to determine if the user is already logged in at the system level. If there is no such entry in the header, the module will revert to the normal login page, and ask for the user's username and/or password as it does today and no "automatic login" is possible. If the header does contain the relevant entry indicating that the user is already authenticated, then the Web+Center module will take the value of the user-name in the header and use it to attempt to access the user's information in the Active Directory using standard LDAP protocol. (i.e. the directory need not reside on the same system as the Web+Center application - but it must be accessible via network using standard TCP/IP protocols.) If at this stage (i.e. the user appears to be an authenticated user on the basis of the HTTP header) the user is not "known" to the Active Directory, the auto-login module will issue a diagnostic indicating the problem and display the "LDAP command string" that it issued to the Directory as an aid to debugging what the problem might be. If the user is "known" to the Active Directory, Web+Center will then insert (if this is the user's first login to Web+Center) or update (if this user has previously logged in to Web+Center and already has an entry in Web+Center's database) the user's information in its own database. (Fields such as the user's first- name, last-name, email address, phone number etc.). Then the user is automatically transferred to the "home page" of the Web+Center Customer Support application as if they had logged in via the usual mechanism. Two other and closely related facilities also become available for users of Tech+Center.
Will it work with other (non-Microsoft) LDAP-compliant Directories?
This facility was built and tested primarily for use with Microsoft's Active Directory, but it uses the industry-standard LDAP interface for all communications with the directory. In that sense, it should work with other compliant directories although obviously we cannot test against all products available on the market. However, there is one area of functionality that may be problematic depending on if or how a certain capability is supported by a non-Microsoft Directory. Remember, there are three main functions that depend on Directory interaction:
The last two of these three facilities are likely to work with any LDAP-compliant directory. However, the first of these (Automatic Login) also depends on the tight integration of Microsoft's IIS server with system-level authentication of the user. Specifically, the web application (Web+Center in this case) will see a special entry in the HTTP header of any web-page invoked by an authenticated user, and the automatic login feature relies on seeing this header to log the user in and identify them. To the extent that any non-Microsoft directory product does or does not support this interaction, so the autologin feature will or will not be able to work with it. (See discussion related to Figs 11 and 11a below) Also - it should be noted that the Directory Integration capability in Web+Center is only available when Web+Center itself runs on a Microsoft platform. Unfortunately when Web+Center runs on a Linux platform, the SUN ONE/Chilisoft software (that is used to support ASP pages) does not support the LDAP access capability, therefore this facility is not available to Web+Center users operating in a Linux environment. This is distinct however from what kind of platform the Directory is operating on. Because all Directory access is via a network-based and neutral protocol, the directory can reside on any compliant platform. (e.g. an "open source" directory running on a Linux machine.) However the limitation identified above (support of Autologin) is then likely to be an issue. In these cases where the Autologin feature cannot be achieved, nevertheless the other two facilities outlined above may provide a useful adjunct toward alleviating problems caused by redundant repositories of customer information.
Enabling the Directory Integration interface
Before you can do anything, you have to first "enable" this facility so that it becomes visible to the rest of the software. If you are logged in as a "Tech" with sufficient privileges, you should go to
→Administration check the box (bottom right of screen) labelled Enable Active Directory Integration via LDAP and click on the submit button.
Use of the LDAP Configurator
The System Administrator must first login to the Web+Center's "Tech Center" in the normal fashion. Now click on the "Administration" button and a new link is now available (near the bottom of the screen) labelled LDAP Cofigurator for Autologin with Active Directory. Clicking on this link will invoke the Ldap Configurator which contains a form to be filled out.
IMPORTANT: As a minimum, you must complete the form fields for:
The first part of the form looks as follows:

Fig 1
These two fields need only be filled in if the Active Directory is not "open" and a user-name and password is required to access it. Depending on your environment, the "username" may take the form of "distinguished name reference" to an entry in the directory where the password is stored, or be as simple as the User Id used by the system administrator who has access to the directory. The next part of the form asks for a series of entries which will appear initially as follows:
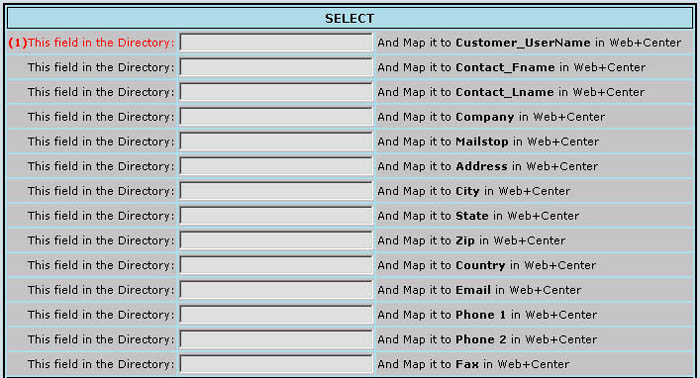
Fig 2
Each line in this block allows the administrator to specify to the system how a particular field in the Active Directory is to be mapped to an equivalent field in Customer+Center. Not all fields are required to be filled in (and indeed it is unlikely that may be possible) but as many as possible should be mapped over in order to increase the usefulness of the Customer+Center. But one field in particular must be filled in order for the system to be able to function at all, and this is the field marked in red with a (1) in the figure above. The Customer+Center application relies on each customer having some kind of unique identifier which can be used to match various records (such as case records, assets, etc.) to that customer's identifying information. Thus you should specify a field in this entry which is unique to a given customer such as uid or account-name or similar. The following shows this part of the form as it might be filled in if you are using all the "standard" names for these fields as they are configured in the Active Directory as released by Microsoft:

Fig 3
NOTE The names for the fields as shown in Fig 3 above are provided here merely as a guide. They may be different depending on how your actual directory is configured (or what it's "schema" loooks like). The names as shown above are those which might be found in an Active Directory configuration that was installed as released ("out of the box") without further modification.
The next major block on the form appears as follows:

Fig 4
In this block, the System Administrator should enter the string that is the network address of the Active Directory itself. In the simplest case this will merely be a simple URL-like address, but more likely you will also have to specify the hierarchical path within the directory that takes you to the level where the relevant entries are stored in the directory, for example as shown above. The string must be prefixed with the LDAP protocol header "LDAP://" as shown in the example above. Experience has shown that creating this "connection string" can be the trickiest part of the whole process. Because each installation will be a little bit different in terms of configuration details, so the detailed format and contents of this string will vary from site to site. A more detailed discussion on how to derive this string may be found elsewhere in this document under the heading "LDAP Connection String - A Guide" below. The next major block on the form appears as follows:

Fig 5
This block of entries is usually not required but is available for interactive testing. These entries are provided so that the Systems Administrator can easily retrieve and examine a range of user records from the directory to see what the contents of the various fields contain across a sample of multiple records. You might for example opt to use it as follows:

Fig 6
In the example shown, it would retrieve all records where the value of the user login-name is within the range where the initial letter is "t" thru "u", i.e. all entries in the direcory between "t" and "u"
NOTE It should be emphasized that this capability is not intended for use during the "production phase" of this facility (although it can be if necessary). It is provided as an aid to interactive exploration of the contents of the directory to determine which fields are used and what they contain across a span of multiple records - without having to retrieve and display all entries in the directory. The last major block on the form consists of two lines and appears as follows:

Fig 7
This block is the primary one which controls the access of a specific entry from the directory. The first of these two lines may not have to be used but is available to provide the necessary flexibility for situations that demand it. Depending on the structure of the directory, there may be only one type (or "Class") of records in the branch of the directory that was navigated to in Fig 4 above, in which case this entry would not be required. However, if it is necessary to distinguish a specific class of records at the specified hierarchical level (branch) in the directory, this line in the form may be used for that purpose as shown. The second of these two lines marked with (2) in the form is another required field when running in "production" although this restriction is not enforced to enable interactive and exploratory testing/access of the directory. In essence, once the LDAP configuration settings have been created, they must be of a nature that returns a single record from the directory � namely the record pertaining to the user who is logging in. Specifically, when a user arrives at the Customer+Center entry module with their unique identification contained in their HTTP header, it is the content of this element that will be employed by the system to define which specific record is to be retrieved from the directory. For example, if the field named in the entry marked as (2) above is defined to be "accountname" and we have a user whose HTTP header contains the value "smithj" then at run time the system will include a phrase in its pseudo-SQL command like " and WHERE accountname = 'smithj'�." Thus it is this particular field which ultimately defines which specific directory record is returned for this user. Therefore it is critical that this field be defined in the settings for the "production" version � although it may be omitted when the LDAP Configurator itself is being tested by the Systems Administrator in exploratory mode. Note - while this field is marked as mandatory, and requires a value in it such that the net effect results in the retrieval of a single record, the value given ("smithj" in this example) is merely supplied by the administrator at this point as a specimen for test purposes. When these parameters are eventualy used in a production scenario, the actual value used will be the login-name of the user who is actualy logging in. It should also be noted that due to their special nature, the directory fields specified in entry (1) and entry (2) on the form are very likely to be the same � although this is not a requirement of the system.
Testing The Configuration Settings
The final block on the LDAP Configurator Form shows three "buttons":

Fig 8
When you have created a tentative configuration setting, you can test it by clicking on the rightmost button labeled "Test Directory Access". At this point, the screen will be repainted with any results displayed below the form to help in the debugging and verification of the setting. (You will probably need to scroll down to see these.) The configurator will display a series of conformatory progress messages as it execute, followed by the pseudo-SQL statement it has generated on the basis of these settings. and attempt to perform directory access. If the directory access was successful, a table will now be displayed on the screen (below the form) showing the entries retrieved in tabular format with any retrived record(s) in a row and the various fields each in its own column. Here is an example of what you might expect to be displayed below the form
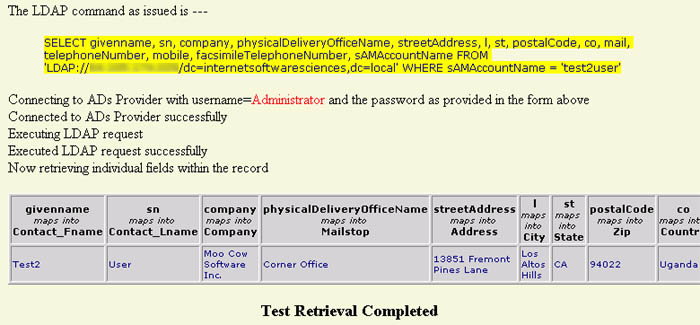
Fig 9
Here we can see the text of the LDAP command string (highlighted in yellow) as it was generated on the basis of the parameter settings in the form. This is followed by a series of one-line trace statements as the configurator progresses thru the various stages of execution. Finally a table (grey background) is displayed showing the column headings for each field and below that the values retrieved for these fields from any retrieved record(s). (The width of the table is truncated for display purposes in the image above - depending on the number of fields requested, it will stretch further to the right and horizontal scrolling will be required to see the whole table) If unsuccessful, the program will fail with some kind of system diagnostic. (See debugging hints below) Examine the settings again as well as the pseudo-SQL statement that was generated to determine what went wrong, modify the entries in the form accordingly, and try again. Remember that the ultimate goal is to retrieve a single entry from the directory that matches the specifications defined in the form field marked with a (2). When these parameters are subsequently used to access the directory and authenticate a user, the value you used in the form field marked with a (2) will in fact be substituted with the user's "log on name" as contained in their HTTP header. (i.e The value specified in the form in Fig 7 as test2user is merely used as a speciment for test purposes and will be substituted another value representing a new user entering the system.)
Storing, and Retrieving The Configuration Settings
When a successful configuration has been achieved, it must be stored in the system using the leftmost button labeled "Capture Configuration". Subsequently, when you bring up the LDAP Configurator afresh, you can re-set the form (to the settings that were previously saved by means of the "Capture Configuration" button) by clicking on the "Load Configuration" button.
Some Debugging Hints
When you try do a "Test Directory Access" a number of different error messages may be returned, some of them quite misleading as to what is actualy failing. Many of these messages are not issued by the LDAP Configurator itself but are issued by the operating environment when something goes wrong, so it is hard to document all the situations you may encounter. However, the following are some of the more common.
Provider error '80040e09' Permission denied.
Provider error '80040e37' Table does not exist.
Provider error '80004005' Unspecified error.
No Record Returned.
Set Up for Automatic Login
Once a correct configuration setting has been created and stored, this will subsequently be used by the Customer+Center Login mechanism to perform automatic "silent" logging in of previously authenticated users and to update their record in the Customer+Center database. In non-directory environments, a user wishing to enter Customer+Center will point their browser to a URL like http://[hostname]/customer50/. This effectively defaults to the expanded URL http://[hostname]/customer50/default.htm. This page then asks the user to log in using the conventional mechanism However, in a directory-enabled environment, in order to accomplish automatic authentication of a user wishing to enter Customer+Center (i.e. the user has already performed a log on at the sytem level) they must instead point their browser to http://[hostname]/customer50/DoAutoLogin.asp. Accordingly, this particular file (DoAutoLogin.asp) which is located in the Customer50 directory must first be configured so that system authentication is required to execute it. To do this, locate the file with Windows Explorer and do a right-click on the filename and select "Properties", and then click on the "Security" tab which should result in a display similar to the following:
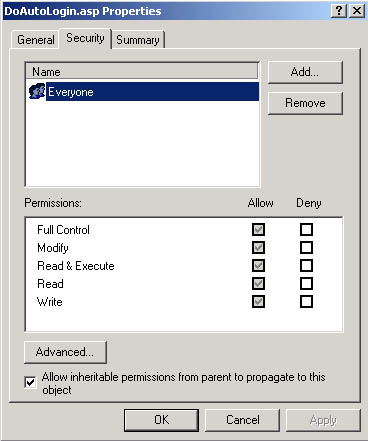
Fig 11
IMPORTANT Change the entry in the upper box to reflect ONLY the (group of) users as defined in the Active Directory that will be using Customer+Center and remove the everyone user for this file. You must remove the user permission for "everyone" user with full control and add the set of users that you want to allow access for the customer+center. You should uncheck the checkbox that says Allow ineritable permissions from parent to propagate to this this object. For example, you might the set of users called "Domain Users" or some other user group. Only this one file (DoAutoLogin.asp) needs to have its file security permissions changed. The other web+center files should still have everyone -full control as the file permissions security setting. Once this file (DoAutoLogin.asp) has the new security permissions applied, when the next user attempts to access it, it will force a windows authentication before the page can be run and viewed. Now open up a new browser window (to ensure it is not already authenticated at least for initial testing) and point it to http://[hostname]/customer50/DoAutoLogin.asp. At this time you should see the system prompt asking you for your username and password thus:
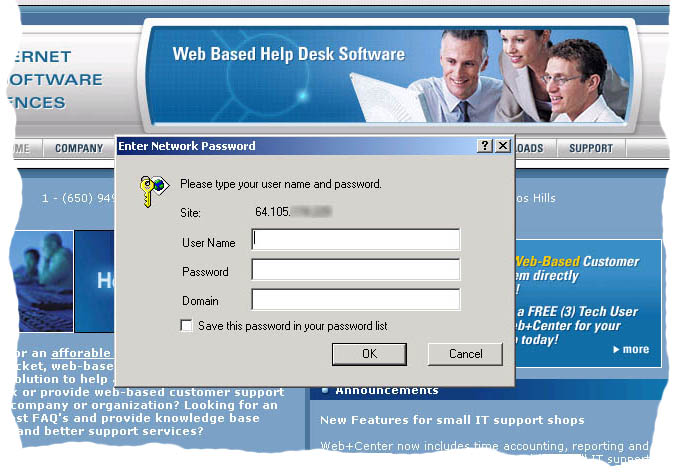
Fig 11a
On supplying these, this module will pick up your login name from the HTTP header, and use the parameters previously established and stored (when you used the LDAP configurator) to access your record from the Active Directory. It will then update the supplied fields from the directory into your Customer record within the Customer+Center database to ensure that the latter are current and then pass you on to the main page of Customer+Center itself as if you had logged in by the conventional means.
Debugging Automatic Login
Should the system fail to re-act at this point as expected, you have a further debugging option that you can invoke at this point. Instead of pointing your browser to http://[hostname]/customer50/DoAutoLogin.asp instead point it to http://[hostname]/customer50/DoAutoLogin.asp?debug=Yes. (The same URL but with the parameter 'debug=yes' appended.) This will cause a series of trace messages (somewhat similar to those produced by LDAP Configurator) to appear on the screen as this module executes each major phase of its operation. This should provide some insight as to what is going wrong if a failure is encountered. * * * Frequently Encountered User Error * * * Experience with the first few users of this mechanism has shown that one particular mistake is frequently made. The administrator intialy sets up LdapConfig and gets it to the point where it is accessing the directory successfully and returning multiple records from the directory. At this point the administrator stores the settings (by clicking on the "Capture Configuration" button). Then finaly, the administrator enters the parameters to cause a single specific record to be returned from the directory (the entry in the form labeled as (2)Name of User-id Field ) and tests it again and determines that indeed now the single desired entry is being retrieved from the directory. At this point, the administrator forgets to again click the "Capture Configuration" button to store the latest working version of the configuration settings, but proceeds directly to test with DoAotologin.asp. The latter then issues an error message that multiple records are being returned from the directory. This occurs because it is using the last stored set of parameters. In this case, you should go back to LdapConfig, make sure the appropriate entries exist in the last line of the form as described above, and make sure that you now click the "Capture Configuration" button to store the complete setting before proceeding again to test with DoAotologin.asp.
Using this mechanism for Tech registration of Customers
Users of Tech+Center can now also make use of this facility to "register" customers into the Web+Center database. This capability allows customers to be registered who interact with techs via telephone rather than Web+Center itself via a browser. With this facility enabled and correcly configured as above, clicking on "Get Customer" will bring up the same "search" screen as before, but with a second small subsidiary form on the right of the screen.
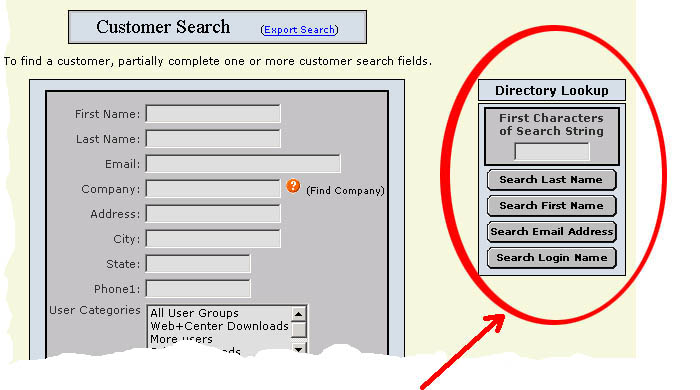
Fig 12
The Tech can now enter the first few characters of a search string in this form, and by clicking on the relevant button cause the directory to search for customers with a matching Last-name, First-name, Email-address or Login-name. A display will then be provided of all matching records, with an indicator as to whether each customer is already known or not in the Web+Center database. By clicking on the relevant entry, the Tech can then cause that customer to be registered (if they were previusly unknown) or to have their details updated (if they were previusly known) in the Web+Center database. Note - while all four buttons are shown in Fig 12, each button is only made available if the relevant field has been defined for access via the LDAP Configuration settings. If any of these fields has not been defined for access, then the relevant button will not be shown. Also be aware that if you click any of these buttons without entering a search string, this will result in the retrieval of all the entries in the directory (because all records qualify under this search criterion). Depending on the size of your directory, this may be a usefull capablity or it may result in a very slow response with a huge amount of output.
Batch (Re)Synchronization of Existing Customers
Any given customer record is re-synched with its directory entry every time that customer enters the system through the automatic login mechanism, thus there should normaly be no need for a batch mechanism to "re-synch" all customer records. However, in certain operating environments (for example where all customer contact with the help desk is via telephone to the technicians, it may become desireable to resynchronize all customer records in the Web+Center database with the latest details as contained in the directory. To this end, a utility is available to the administrator to perform this function.
If you click on:
If you leave the first box empty it will default to "beginning of file" and if you leave the second box empty it will default to "end of file" respectively. If for example you enter "a" in the first box and "j" in the second box, it will synchronize all customer records whose first letter of the customer_id lies between ""a" and "j" inclusive.
The LDAP Connection String - A Guide
The contents of the parameter for the LDAP Connection String (see Fig 4 above) will vary greatly from site to site depending on the configuration details of the system (webserver as well as AD server) and the network configuration. The following discussion is provided as a guide that may help you determine how to set up this string. The first thing to do is to determine whether you have the "ADSI Edit" utility available on the Active Directory server machine. You can do this by using the "Search" capability (under the "Start" button at the bottom left of your desktop screen) and searching for a file called "adsiedit.msc" . This file may not be present on the system (it is not usualy loaded in the default set up for the server) in which case you will have to install it from the "Windows Server Support Tools Pack" disk that came with your system. Once you have located this file, double-click on it to launch the utility, and a window will come up which has the familiar type of layout as seen for instance with the File Explorer. There is a pane on the left showing a hierarchical structure, and the pane on the right shows the contents within the level of hierarchy that is selected in the left pane. Different levels of the hierarchy in the left pane can be expanded or collapsed by clicking on the small plus (+) or minus (-) icons opposite entries that contain further sub-levels. The annotations shown in red on Fig 13 below pertain to the following discussion.
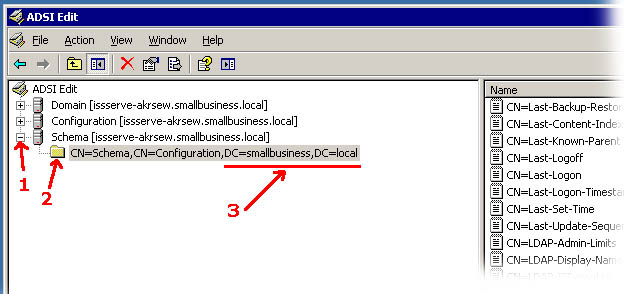
Fig 13
The first thing you want to do is identify and expand the level of the hierarchy identified as "Schema" by clicking on the little plus (+) button to its left if it isn't already expanded. (marked as 1 in Fig 13 above) In the example above, the configuration (i.e. the schema) of the directory is in its simplest default form, there are no further hierarchical levels below this one. We can determine that because it does not have a plus (+) sign to its left (at the point marked 2) which would indicate it is capable of further expansion. If there is a plus sign (+) at this level, it indicates that there are further hierarchical levels defined in the directory and you should consult with the administrator who designed/installed the directory to determine at which level your user records exist within your directory. For purposes of this discussion we will continue to assume we are dealing single level default schema as depicted above. Now examine the string annotated with 3 above. From this we derive what the right-hand end of the LDAP Connection String has to look like. For simplicity's sake, let us assume we are going to use the direct IP address of the server on our connection string, it would look like LDAP://<ip address>/dc=smallbusiness,dc=local >From this we can see that the LDAP Connection String is composed of three main parts separated by slash (/) characters:
It is useful to view the overall string as something you would read from left to right to point to a level within the hierarchical structure where user records are to be found. Just as you may be familar with a file path on your system such as C:Directory/subdirectory/subsubdirectory/filename.text to represent a hierarchical path leading from the outermost level to point to a specific file, so too this LDAP connection string can be read similarly from left to right as going from an outermost level to a point within the hierachy. Thus if there are further levels of hierarchy within your directory beyond the flat default structure depicted above, so you will have to further extend the LDAP Connection string to the right to specify the total path. As an example, consider the following connection string: LDAP://directory.acme.edu/dc=directoryserver,dc=local,ou=people,ou=faculty In this case (reading left-to-right) we are pointing to the "directory server" network node at directory.acme.edu, and then within that location we have a hierarchical path specifying a machine/network node name of "directoryserver.local" (but expressed in terms of LDAP syntax as dc=directoryserver,dc=local) and within that then a further hierarchical path within the directory specifying an organizational unit of "people" and then further within that an organizational unit of "faculty". |
